Network Setup
Security groups
Security groups are a means to control inbound and outbound network traffic for your VMs. This includes protection of network traffic even among your VMs. The default security group in every new project limits network traffic to the bare minimum that is required to run a VM. It does not even allow for incoming connections via SSH or ICMP traffic (ping). Therefore, you will want to add rules to the default security group or add additional groups containing such rules.
In order to be able to access a VM via SSH once you have started it, you will at least have to add a rule to allow for this.
- Go to the Project → Network → Security groups tab
- Select Create security group and create a group with a meaningful name, e.g. ssh_external
- Select Manage rules on the newly created security group
- From the number of predefined rules select SSH
- For the remote select CIDR, which, plainly put, is a way to express network ranges
- If you really want to allow SSH traffic from anywhere, then the default 0.0.0.0/0 is the right choice. In order to limit traffic to sources within the Juelich campus, you would use 134.94.0.0/16.
Keep in mind that the granularity of assigning rules to VMs is by security group only. Therefore, it is advisable to group rules that are commonly used together in security groups.
Again, should you prefer to use the generic documentation, please refer to the OpenStack Documentation. This may help you get a better understanding of the concept of security rules, but uses the command-line interface to set everything up.
Available ports
Resources in HDF Cloud are located in a dedicated DMZ at JSC, which determines the rules for accessing VMs and also for outbound network traffic. This results in a limited number of ports being available to offer services in virtual machines. For security considerations, inbound connections to HDF Cloud are limited to the following ports.
Port | Purpose | Availability |
|---|---|---|
80 | HTTP | global |
443 | HTTPS | global |
22 | SSH | global |
7000-7020 | general purpose, custom services | global |
5432 | PostgreSql DB | from HPC systems |
3306 | MySql, MariaDB | from HPC systems |
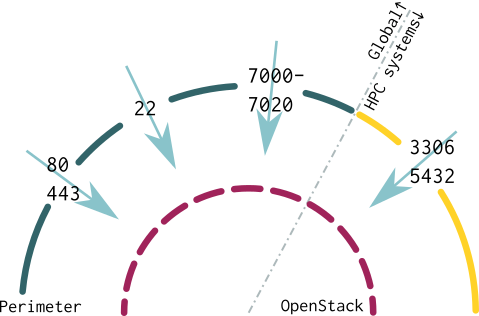
The following diagram captures this information graphically. Whereas the OpenStack firewall can be configured at a user's own discretion, the perimeter firewall imposes the rules as stated above.
Users located at JSC may see a more liberal firewall policy, which should be taken into account when exposing services to the general public.
Should your software insist on using a specific port and not be reconfigurable to any of the available ports, a local redirect may solve this problem for you. The following is an example of redirecting port 80, which is available in HDF Cloud, to local port 8080, which is very often used by user managed web servers or development environments.
$ sudo iptables -t nat -A PREROUTING -p tcp --dport 80 -j DNAT --to-destination :8080
This will redirect external connections from outside the host. If you need the same redirection on localhost (IP address 127.0.0.1), then an additional rule is required to do this:
$ sudo iptables -t nat -A OUTPUT -p tcp -o lo --dport 80 -j REDIRECT --to-ports 8080
Please be sure to have a mechanism in place to persist these settings, so they will survive a reboot of the VM.
Outbound connections are possible with the sole exception of port 25/tcp, which is used for unauthenticated SMTP. If you need to send emails, then please use port 587/tcp to connect to your mail submission server.
Create and manage networks
IMPORTANT NOTICE: At project creation time, we will typically create a network, subnet, and router for you, such that the following steps will not be needed in most cases. However, should you ever need to create additional networks or re-create the default configuration, please follow the instructions below. Alternatively, you can request support from ds-support@fz-juelich.de, as we have the proper tooling to set this up quickly.
Create a network
- Go to the Project → Network → Networks tab and select Create network.
- Define a name for the network, Admin status and Create subnet should both be "enabled". Select Next.
- Define a Name for the subnet. You could have several subnets per network. If you only intend to use one, then the Subnet name may be the same as the Network name chosen on the previous tab. The same holds true for the first network you create.
The network address should be a private network range, such as 192.168.42.0/16 or 10.0.0.0/8. This range is only available within your network and by the connected router (see next section). In the subnet details, it is important to set the following three DNS servers:
- 134.94.32.3
- 134.94.32.4
- 134.94.32.5
Create a router
A router is required to allow for virtual machines (VMs) on your internal network to reach the outside world or other networks within your project. You will also need a router to reach VMs from the outside, which is the case if you want to offer services on your VMs.
- Go to the Project → Network → Routers tab and select Create router
- Define a Name for the router, Admin status "enabled", and an External network, which for the HDF cloud will be "dmz-hdf-cloud".
- The router is already connected to the DMZ network automatically, but you still need to connect it to your internal networks. This is done at Project → Network → Router, select the router, then Interfaces, then Add interface. Add an interface in your internal network.
Generic OpenStack documentation
If you prefer the generic documentation that may be lacking important information regarding our local installation, please refer to the OpenStack documentation.